Setting up a project for multi-platform development can be quite easy. Just add a new solution platform and you’re done!
This will not work for all projects. Your code (or third-party libraries) might not work on all target platforms. A possible example of this is rendering code: you might want to use DirectX. This will work on Windows, but it won’t on Linux. Here, you might choose to write two rendering implementations: one for Windows (with DirectX), and one for Linux (with OpenGL).
Sure, in this case, you could use OpenGL on both. This won’t be the case for all platforms, which is why I am writing this article.
There’s a multitude of engines to be found on GitHub. Crytek’s CryEngine is one of those. For illustrative purposes, I’ll be looking at some of the code in this repository.
A Closer look at CryEngine
CryEngine has a struct that serves as an interface for the input: IInput. Its functions are pure virtual functions, so all of these need to be implemented for each platform.
The actual input class is created in CryInput.cpp’s Initialize-function. The function looks as follows:
virtual bool Initialize(SSystemGlobalEnvironment& env, const SSystemInitParams& initParams) override
{
	IInput* pInput = nullptr;
	//Specific input systems only make sense in 'normal' mode when renderer is on
	if (gEnv->pRenderer)
	{
#if defined(USE_DXINPUT)
		pInput = new CDXInput(env.pSystem);
#elif defined(USE_DURANGOINPUT)
		pInput = new CDurangoInput(env.pSystem);
#elif defined(USE_LINUXINPUT)
		pInput = new CLinuxInput(env.pSystem);
#elif defined(USE_ORBIS_INPUT)
		pInput = new COrbisInput(env.pSystem);
#else
		pInput = new CBaseInput();
#endif
	}
	else
	{
		pInput = new CBaseInput();
	}
	// ...
}
The header has a similar setup:
#if CRY_PLATFORM_LINUX || CRY_PLATFORM_ANDROID || CRY_PLATFORM_APPLE
// Linux client (not dedicated server)
	#define USE_LINUXINPUT
	#include "LinuxInput.h"
#elif CRY_PLATFORM_ORBIS
	#define USE_ORBIS_INPUT
	#include "OrbisInput.h"
#elif CRY_PLATFORM_DURANGO
	#define USE_DURANGOINPUT
	#include "DurangoInput.h"
#else
// Win32
	#define USE_DXINPUT
	#include "DXInput.h"
#endif
#if !defined(_RELEASE) && !CRY_PLATFORM_WINDOWS
	#define USE_SYNERGY_INPUT
#endif
#include "InputCVars.h"
The approach taken here is absolutely valid, and works. I can’t say I like the way this looks, though. The preprocessor directives make sure this code won’t win a beauty contest. There’s got to be a different way of doing this, right?
Reducing the Number of Preprocessor Directives
Below, I’ll cover three options on how to set up your solution. For the examples, I’ll use Windows and Linux as target platforms.
1. Leveraging the Linker
This way of reducing the number of preprocessor directives is quite simple: give the implemented classes the same name, and only include the appropriate header.
The implemented class(es) look as follows:
#include "IInput.h"
class InputImplementation : public IInput
{
	// Override (pure) virtual functions here
}
Including the correct header and creating an instance of the correct class:
#include "IInput.h"
#if defined(PLATFORM_WINDOWS)
#include "WindowsInputImplementation.h"
#elif defined(PLATFORM_LINUX)
#include "LinuxInputImplementation.h"
#endif
IInput* IInput::GetInstance()
{
	static IInput* instance;
	if(!instance)
	{
		instance = new InputImplementation;
	}
	return instance;
}
Simple, right?
You can make it even simpler, but that comes at the cost of having to give all implementation files the same name.
But what if you don’t want to name all implementation classes the same? Then using “using” is still a possibility:
#if defined(PLATFORM_WINDOWS)
#include "WindowsInputImplementation.h"
using InputImplementation = WindowsInputImplementation;
#elif defined(PLATFORM_LINUX)
#include "LinuxInputImplementation.h"
using InputImplementation = LinuxInputImplementation;
#endif
Regardless of which of these two you choose, you probably don’t want to compile all of the code when building for one platform. You could put all of the platform-specific code between preprocessor directives as well, but that’s something we can avoid through the setup of our solution and projects.
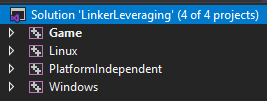
In a Visual Studio solution, this is what this setup could look like:

Two things to keep in mind:
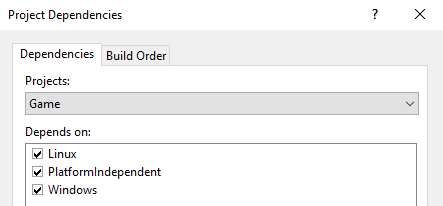
1. You’ll have to set up build dependencies to manage the order in which the projects build.
Right-click on a project and select “Build Dependencies” -> “Project Dependencies”.

Game should depend on all other projects, PlatformIndependent should depend on both platforms, and both platforms don’t have any dependencies.
2. You shouldn’t forget to link the (correct) libraries.
For “PlatformIndependent”, this will be “Linux” and “Windows”, and for “Game”, this will be “PlatformIndependent”.
(If you opt for dynamic libraries, this might be different. Maybe you’re linking implicitly, maybe you’re doing so explicitly.)
Includes
Having multiple projects is not a problem, until you want to add some additional include directories. Assuming you don’t want to use relative paths like "../../ProjectName/inc/HeaderFile.h", this is where you’ll run into some trouble. Adding an includes-folder to the current project’s additional includes will allow you to continue programming smoothly. However, when you compile, the header you just included can’t be found. This is because the project this compiles into (let’s say “PlatformIndependent” to “Game”) doesn’t have the additional include directory set.
Here, you might want to introduce property sheets into the solution. These property sheets contain settings shared by the projects that use them.
To create a new property sheet, open the Property Manager (“View” -> “Property Manager”), right-click a project (maybe select all of them) and click “Add New Project Property Sheet”. Give it a nice name (perhaps “AdditionalIncludes”), and click “Add”.
In the properties of this property sheet, open the “C/C++” tab, and edit the additional include directories. There’s two you’ll probably want for every project: $(ProjectDir)inc and $(SolutionDir)PlatformIndependent\inc.
2. Single Header Setup
What if you don’t want multiple projects, or think that virtual functions are the work of the devil (or, a bit less extreme, just think they’ll impact your program’s performance too much)? Fear not, there is a way to facilitate this as well.
To set this up, you’ll have to modify the vcxproj file directly. Before doing that though, create a header and a source file. Either place the source file for one configuration in a different folder than the other (“Windows”, “Linux”), or give the file a different name (“InputWindows”, “InputLinux”).
Now, open the vcxproj file and find the source file. It will look something like this: <ClCompile Include="src\Windows\Input.cpp" />.
We don’t want this source file to be built for Linux as well (and maybe we can’t), so we want to conditionally exclude it from the build:
<ClCompile Include="src\Windows\Input.cpp">
  <ExcludedFromBuild Condition="'$(Platform)'=='ARM'">true</ExcludedFromBuild>
</ClCompile>
Do keep in mind: you’ll have to do this for every file you add.
Save the file and return to Visual Studio. Reload the solution when prompted.
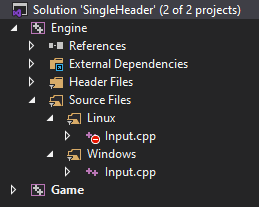
If you’ve added files for different platforms already (and added the conditional exclude), you’ll see your project looking somewhat like this:

Change your selected configuration, and the small icon indicating build exclusion will have moved to the other source file.
What if you want to store a variable with a platform-specific type in this class without preprocessor directives? Then you can add a forward declaration to the header, and have the class that needs it store a pointer to it. Make sure that the source file does contain the type’s definition (either through including a header that contains it or by defining it yourself).
3. One Source File Per Header
If, for whatever reason, you are set on having only one source file per header, but still need to support different platforms, fear not!
void Platform::PrintPlatformName()
{
#if defined(PLATFORM_WINDOWS)
	printf("\nWindows");
#elif defined(PLATFORM_LINUX)
	printf("\nLinux");
#endif
}
Oh, now we’re back at what I was trying to avoid. Let’s try something else.
#if defined(PLATFORM_WINDOWS)
void Platform::PrintPlatformName()
{
	printf("\nWindows");
}
#elif defined(PLATFORM_LINUX)
void Platform::PrintPlatformName()
{
	printf("\nLinux");
}
#endif
Yeah… no. Let’s not limit ourselves to one source file per header.
Conclusion
There are multiple ways of setting up a solution for multi-platform development. Ultimately, the way you end up doing this comes down to preference. At least, I couldn’t find any convincing arguments to use one setup over another that didn’t come down to “I just like this more”, or “I think this way is more convenient”. The method described under “Leveraging the Linker” will take more effort to set up initially, but shouldn’t be that hard to maintain. The “Single Header Setup” takes less effort to set up, but requires some effort every time someone adds a new file.
If you decide on how to set up your solution early on and stick with it, things will probably work out fine regardless of which method you choose. You’ll find some issues, and then solutions for these issues. Switching to a different setup as soon as there is some friction might temporarily make things easier, but you’ll likely run into other issues at some point. Maybe another setup could have avoided those issues, but you’ll only learn about this through experience.
When working with a team, one option might prove to be more of a hassle than another. Getting everyone filled in on how to use the setup that has been chosen and then getting them to actually use it properly can prove difficult. Maybe they’ll have some trouble with adding additional includes (like third-party libraries), or they don’t want to go through the hassle of editing the vcxproj-file (or simply forget to do so). Again, don’t immediately switch when there’s some friction. Doing so would mean that the entire team has to adapt, and the initial problem might still exist as the problem might not have been the setup after all.
Example Projects
If you don’t want to go through the effort of setting up the solutions in order to see which setup you like best: I’ve put two example solutions on my GitHub.