For all blueprint functions you create, Unreal Engine will provide you with a blueprint node to call that function. These nodes are generated automatically, and will (probably) do exactly what you expect from them. There’s no need to think about these nodes any further. But what if the default node generation is not quite what you want?
K2 Nodes
All blueprint graph nodes inherit from the same class: UK2Node. Auto-generated blueprint nodes, for example, are instances of UK2Node_CallFunction, a class that derives from UK2Node. While this class makes it easy to create a new blueprint node for any function, these nodes are all very generic.
Not all blueprint nodes are instances of this function-calling node, so there are various references you could look at to get an idea of how to create your own “special” nodes. One of the simplest examples is UK2Node_Knot, which you might know as the reroute node. Maybe this class is too simple, and you want to know a bit more. Depending on what node you look at next, you might be left confused. For example, UK2Node_IfThenElse‘s code feels completely different from UK2Node_Knot, and trying to understand this class might leave you discouraged.
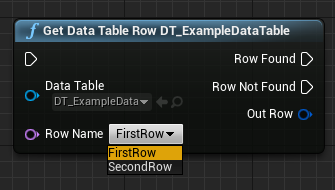
Take a step back and think about what it is that you want out of a custom blueprint node. For me, this was a string drop-down on my blueprint node, as an enum didn’t cut it. A node that solves a similar issue already exists: UK2Node_GetDataTableRow. Only looking at this class was not enough to create a similar node, so I went down the rabbit hole of Unreal Engine source code. Luckily, I did end up with the information I was looking for (and more), but you might not have to do this depending on your needs.
Creating Your Own Blueprint Nodes
Dependencies and Project Setup
Custom blueprint nodes should inherit from the UK2Node-class, which is part of the BlueprintGraph module. If you add this as a (public) dependency in your game module, you won’t be able to package your game any more. BlueprintGraph depends on UnrealEd, which throws a BuildException in non-editor builds.
In order to deal with this, a separate module of a type like UncookedOnly or Editor has to be used. To add an additional module to a uproject or uplugin, something like this has to be added:
{
	"Name": "ModuleNameNodes",
	"Type": "UncookedOnly",
	"LoadingPhase": "PreDefault"
}
Other dependencies for K2 nodes are the modules KismetCompiler, UnrealEd, and GraphEditor.
The Node Class
To create a new K2 node, create a class that derives from UK2Node. Unreal Engine’s K2 nodes follow the naming convention of UK2Node_NodeName, but you don’t have to follow that convention if you prefer something else.
This article will not be covering every single function that you can override, as there are quite a lot of them. Instead, I will be going over the functions that will probably be the most useful to override when creating your own K2 nodes.
Adding Pins
The first function we’ll be looking at is AllocateDefaultPins. This function is used to create default pins for the node (which you might have expected based on the name of the function).
To create a pin, use the CreatePin-function. The first two parameters for this function are the pin direction (EEdGraphPinDirection) and the pin category. The remaining arguments differ between the various overloaded functions, but the simplest version requires only the name of the pin.
The pin category should be a constant from UEdGraphSchema_K2 (prefixed with PC_), and the pin name can be whatever you want it to be, although UEdGraphSchema_K2 does provide names for special pins that could be required for some node types (prefixed with PN_). Unless you are using a special pin name, it might be a good idea to store the pin name as a constant in your K2Node-class as you will be (likely) be needing this later on.
CreatePin will return the created pin as a UEdGraphPin*, which you can use for various things like setting the display name, default value, or tooltip for the pin.
If your node is not a pure node, the AllocateDefaultPins-function should be used to add execution pins. This is quite simple, and can be done like this:
CreatePin(EGPD_Input, UEdGraphSchema_K2::PC_Exec, UEdGraphSchema_K2::PN_Execute);
CreatePin(EGPD_Output, UEdGraphSchema_K2::PC_Exec, UEdGraphSchema_K2::PN_Then);
The result will look something like this:

After adding execution pins, it’s time to add other pins. For example, adding an input pin (taking an FName) and one output pin (a boolean):
CreatePin(EGPD_Input, UEdGraphSchema_K2::PC_Name, FName("NameIn"));
CreatePin(EGPD_Output, UEdGraphSchema_K2::PC_Boolean, FName("BoolOut"));
The resulting node:
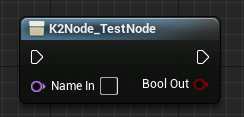
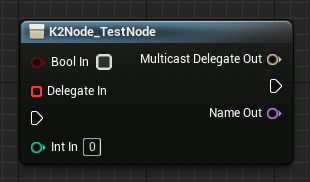
Note that the order in which the pins are added is also the order in which they appear, so you probably want to start with execution pins unless you plan to create some “artistic” blueprints. Admittedly, it’s not completely unthinkable that you could want an execution output pin under some variables if you have a second execution pin that is used when the output variables are empty (like if a data table row could not be found). Still, I would advise against this if you want your node to be consistent with other blueprint nodes.
Adding the Node to a Blueprint
After setting up the pins, you might want to check if it looks the way you expect it to. If you can’t seem to add it to your blueprint, there is a function you still have to override: GetMenuActions. This function allows you to add a node spawner to the “Blueprint Action Database Registrar”. Despite the imposing name, implementing the function is quite easy, and a fair number of Unreal Engine’s K2 nodes use the same implementation:
void UK2Node_TestNode::GetMenuActions(FBlueprintActionDatabaseRegistrar& ActionRegistrar) const
{
	UClass* actionKey = GetClass();

	if (ActionRegistrar.IsOpenForRegistration(actionKey))
	{
		UBlueprintNodeSpawner* nodeSpawner = UBlueprintNodeSpawner::Create(GetClass());
		check(nodeSpawner != nullptr);

		ActionRegistrar.AddBlueprintAction(actionKey, nodeSpawner);
	}
}
First, check if the action registrar is looking for actions of this type. If it’s regenerating the action list for a specific asset, there might not be any need for this action to be registered.
Then, create a node spawner for the current node class and add it to the action registrar.
To make sure the registered node spawner doesn’t show up in the top level of the context menu, the function GetMenuCategory should be implemented.
It is also possible to add more than a single node spawner, which can be useful in situations where you need the same node with a slightly different setup. An example of this is input, where getting the axis value for one axis uses the same logic as it does for another axis, so it would be a waste of time to create a separate class for each input axis.
This can be achieved by setting UBlueprintNodeSpawner‘s CustomizeNodeDelegate to the function you want to be executed after the node is spawned.
A simple example would be a node with three different names:
void UK2Node_TestNode::GetMenuActions(FBlueprintActionDatabaseRegistrar& ActionRegistrar) const
{
	UClass* actionKey = GetClass();

	if (ActionRegistrar.IsOpenForRegistration(actionKey))
	{
		auto CustomizeNodeLambda = [](UEdGraphNode* NewNode, bool bIsTemplateNode, FString NewNodeTitle)
		{
			UK2Node_TestNode* node = Cast<UK2Node_TestNode>(NewNode);
			node->NodeTitle = NewNodeTitle;
		};

		for (int i = 1; i < 4; ++i)
		{
			UBlueprintNodeSpawner* nodeSpawner = UBlueprintNodeSpawner::Create(GetClass());
			nodeSpawner->CustomizeNodeDelegate = UBlueprintNodeSpawner::FCustomizeNodeDelegate::CreateStatic(CustomizeNodeLambda, FString("Test node " + FString::FromInt(i)));
			check(nodeSpawner != nullptr);

			ActionRegistrar.AddBlueprintAction(actionKey, nodeSpawner);
		}
	}
}
Suddenly, you can place three new nodes in your blueprint even though you only created one class:

Node Appearance
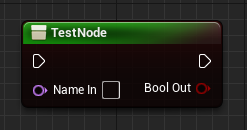
As you might have noticed, most images so far contained a node with the name “K2Node_TestNode”, which is the name of the class. It’s not the best-looking name, so you might want to replace it. Simply override the GetNodeTitle-function to do this:
FText UK2Node_TestNode::GetNodeTitle(ENodeTitleType::Type TitleType) const
{
	return NodeTitle;
}
It’s also possible to change the color of the title bar by overriding GetNodeTitleColor, and the tint of the node can be specified in GetNodeBodyTintColor.
Adding Logic to the Node
How does the node know how to behave? Well, it doesn’t. If you just want the node to be replaced by a function call, inherit from UK2Node_CallFunction and call SetFromFunction when initializing the node. If you want to do a bit more, you need to tell the node how to behave through an override for ExpandNode. This function is used to… blueprint in C++. This will probably make a bit more sense when accompanied by an example.
void UK2Node_TestNode::ExpandNode(FKismetCompilerContext& CompilerContext, UEdGraph* SourceGraph)
{
	Super::ExpandNode(CompilerContext, SourceGraph);

	// Create a node to call a function (UExampleClass::ExampleFunction)
	UK2Node_CallFunction* testFunctionCall = CompilerContext.SpawnIntermediateNode<UK2Node_CallFunction>(this, SourceGraph);
	testFunctionCall->FunctionReference.SetExternalMember(
		GET_FUNCTION_NAME_CHECKED(UExampleClass, ExampleFunction),
		UExampleClass::StaticClass()
	);
	testFunctionCall->AllocateDefaultPins();

	// Move the execution pins
	CompilerContext.MovePinLinksToIntermediate(*GetExecPin(), *(testFunctionCall->GetExecPin()));

	UEdGraphPin* thenPin = FindPinChecked(UEdGraphSchema_K2::PN_Then);
	CompilerContext.MovePinLinksToIntermediate(*thenPin, *(testFunctionCall->GetThenPin()));

	BreakAllNodeLinks();
}
In this example, we simply substitute our K2 node with an intermediate node: UK2Node_CallFunction. This node is created, and the execution pins are moved from our K2 node to the function call’s node.
For simplicity’s sake, the example does not use any of the variable in- and output pins from TestNode. Using these pins is done just like execution pins in the example, unless the variable is passed in as a literal. In that case, the pin’s DefaultValue, DefaultObject, or DefaultTextValue should be copied over instead.
Node expansion will not have any visual effect on your blueprints, so debugging your implementation can be tricky. To help with implementing this function, I would recommend first doing it all in blueprints, so that you can get a better idea of what is actually happening (or should be happening).
The function that is called by UK2Node_CallFunction needs to be callable through blueprints, but you can use the meta tag BlueprintInternalUseOnly to prevent it from being called directly in blueprints. Additionally, the function that you make the node call should be part of a module that is actually shipped with the game. Placing it in the same module as the node will probably lead to your game crashing when the node is hit.
Node Validation
If you want to verify that a user is using the node correctly (e.g. all pins have a connection, all values are within a certain range), the node can be validated. There are two functions in which this can be done: EarlyValidation and ValidateNodeDuringCompilation. Both of these functions are passed a FCompilerResultsLog to which you can log notes, warnings, and errors. To add a jump link to the node, the following can be done: MessageLog.Error(TEXT("Invalid node setup for node @@"), this);.

While there are two functions specifically meant for node validation, you don’t have to implement both (or either). The difference between EarlyValidation and ValidateNodeDuringCompilation seems to be that ValidateNodeDuringCompilation does not run unless the node is actually used by the blueprint. For example, the self-node (which implements ValidateNodeDuringCompilation) logs a warning when used in a Blueprint Function Library, but only if the node is used. Simply having it in the graph is not enough to result in a warning. The node “Get Data Table Row” (which implements EarlyValidation) logs an error when no data table is set, even if the node is not connected to anything.
Going Further
So, you now know how to create a K2 node. But so far, this is nothing you can’t achieve with a blueprint node automatically generated from a UFUNCTION. Even things like split execution pins are nothing special, so why bother going through all this effort?
If node appearance and validation aren’t convincing enough, maybe the ability to add various Slate elements to your nodes can convince you. How useful this is depends on what your node is supposed to do, but this can be useful in situations where a function takes a string that might be used in various blueprints (as this is typo-prone). For example, data table row names.
Setting this up is not done in the K2 node itself, but rather through a pin factory.
Pin Factory
A pin factory is used to create the slate element for a pin. The base class for a pin factory (FGraphPanelPinFactory) can be found in UnrealEd module’s EdGraphUtilities.h. The class only has a single virtual function, CreatePin, from which the constructed pin is returned. Creating a pin factory is quite easy, but the real challenge lies in the graph pin itself (though less so if you’re familiar with Slate). But first things first, the pin factory.
The implementation of the pin factory could look as follows:
TSharedPtr<class SGraphPin> FTestNodePinFactory::CreatePin(class UEdGraphPin* InPin) const
{
    UObject* outer = InPin->GetOuter();

    if (outer->IsA(UK2Node_TestNode::StaticClass()))
    {
        return SNew(SGraphPinTest, InPin);
    }

    return nullptr;
}
There are various other checks you could do in this function, like checking if InPin->PinType.PinCategory is the type you expect it to be (for example, UEdGraphSchema_K2::PC_Name), and if the pin is connected to anything.
Pin Factory Registration
Before Unreal will be able to use the pin factory, it first has to be registered. This is something you could do in the module’s StartupModule-function. You should also unregister the pin factory, for which the ShutdownModule-function is a good fit:
void FTestNodesModule::StartupModule()
{
	TestNodePinFactory = MakeShareable(new FTestNodePinFactory());
	FEdGraphUtilities::RegisterVisualPinFactory(TestNodePinFactory);
}

void FTestNodesModule::ShutdownModule()
{
	FEdGraphUtilities::UnregisterVisualPinFactory(TestNodePinFactory);
}
Graph Pins
The base class for graph pins, SGraphPin, has one function you should override: GetDefaultValueWidget. This function returns the widget that should be displayed in place of the default pin value when nothing is connected to the pin.
Following the inheritance all the way up shows that SGraphPin derives from SWidget, so there’s enough functions you could override, but you probably don’t have to. A function you should implement is one that allows you to construct the Slate object through SNew: Construct(const FArguments& InArgs, UEdGraphPin* InGraphPinObj). These two parameters are the minimum you need, and you can add more if you need them (as long as you don’t forget to pass them to SNew).
In Construct, you should call the Construct-function of your parent class to make sure that that is constructed properly as well. A minimal SGraphPin would look something like this:
#pragma once

#include "CoreMinimal.h"
#include "Widgets/DeclarativeSyntaxSupport.h"

class SGraphPinTest : public SGraphPin
{
public:
	SLATE_BEGIN_ARGS(SGraphPinTest) {}
	SLATE_END_ARGS()

	void Construct(const FArguments& InArgs, UEdGraphPin* InGraphPinObj)
	{
		SGraphPin::Construct(SGraphPin::FArguments(), InGraphPinObj);
		// Do your own construction here
	}

protected:
	virtual TSharedRef<SWidget> GetDefaultValueWidget() override
	{
		// Construct and return default value widget
	}
};
Making GetDefaultValueWidget return a checkbox would result in the node looking like this:
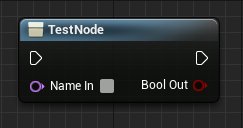
Aside from creating your own SGraphPin-derived class, it is also possible to use one of the existing child classes. For example, SGraphPinNameList is already a thing, so there is no need to reinvent the wheel if this kind of pin is what you’re looking for.
Conclusion
Unreal Engine’s auto-generated blueprint function nodes are enough for most users, but you’ll have to look at making a custom K2 node if you want something a bit different. How difficult this becomes depends on what you need, as making a node that calls a single function and has some validation on how the node is used is not very difficult, whereas changing the default value pin’s appearance can be more complex. Whether this is worth it differs on a case-by-case basis, so know what you’re getting into before you start working on a custom node.
If you want to see the content of this article applied in a bit more context than just some code snippets, consider checking out this repository on GitHub.