CTest is a testing tool distributed as part of CMake. So, if you’re not using a Visual Studio solution and have a CMake project instead, CTest is what you’ll want to use for unit tests.
Setup
Writing and configuring tests with CTest in Visual Studio works the same as it would in any CMake environment: Add enable_testing() (or include(CTest), which automatically calls enable_testing() as well) to your root CMakeLists.txt. After this, you can use the add_test-function to add tests.
Using include(CTest) defines BUILD_TESTING for you (as CMake variable). You can set this to false in CMakeSettings.json if you want a configuration that does not build tests.
You can use this definition to only add testing subdirectories if needed:
include(CTest)
if(BUILD_TESTING)
    add_subdirectory(./TestDirectory)
endif(BUILD_TESTING)
In the test directory, you’ll need a CMakeLists.txt as well. In here, add_test should be used to add all tests. You can do this in multiple ways.
Assuming you only have one test file, you could do this:
set(SOURCES UnitTests.cpp)
set(test_name unittests)
add_executable(${test_name} ${SOURCES})
target_link_libraries(${test_name} SomeLibrary)
add_test(${test_name} ${test_name})
However, if you have multiple test files, you will need to do something slightly differently. Either define a single entry point, or create a separate executable for each test:
set(SOURCES UnitTests.cpp MoreUnitTests.cpp)
foreach(test ${SOURCES})
    set(test_name ${test}_ctest)
    add_executable(${test_name} ${test})
    target_link_libraries(${test_name} SomeLibrary)
    add_test(${test_name} ${test_name})
endforeach()
Like this, you don’t have to add add_executable and add_test for every test, yet they are still run as separate executables. Additionally, you wouldn’t have to use target_compile_options, target_link_libraries, target_include_directories or any other function multiple times.
The disadvantage of this is that every test includes everything, even though it’s not needed. Alternatively, you could add every test individually:
add_executable(UnitTests_ctest "UnitTests.cpp")
target_link_libraries(UnitTests_ctest SomeLibrary)
add_test(UnitTests_ctest UnitTests_ctest)
add_executable(MoreUnitTests_ctest "MoreUnitTests.cpp")
target_link_libraries(MoreUnitTests_ctest AnotherLibrary)
add_test(MoreUnitTests_ctest MoreUnitTests_ctest)
This gives you more control over what each individual test can use. If you’re writing a bunch of tests for the same (static) library, you could split up the tests into multiple executables:
# Tests for X
set(LibraryX_test_tources LibraryXTest1.cpp)
set(test_name unittestsX)
add_executable(${test_name} ${LibraryX_test_tources})

target_link_libraries(${test_name} LibraryX)

add_test(${test_name} ${test_name})
# Tests for Y
set(LibraryY_test_sources LibraryYTest1.cpp)
set(test_name unittestsY)
add_executable(${test_name} ${LibraryY_test_sources})

target_link_libraries(${test_name} LibraryY)

add_test(${test_name} ${test_name})
Or, if you want multiple testing files with separate entry points:
set(LibraryX_test_sources LibraryXTest1.cpp LibraryXTest2.cpp)
foreach(test ${LibraryX_test_sources})
    set(test_name ${test}_ctest)
    add_executable(${test_name} ${test})
    target_link_libraries(${test_name} LibraryX)
    add_test(${test_name} ${test_name})
endforeach()
set(LibraryY_test_sources LibraryYTest1.cpp LibraryYTest2.cpp)
foreach(test ${LibraryY_test_sources})
    set(test_name ${test}_ctest)
    add_executable(${test_name} ${test})
    target_link_libraries(${test_name} LibraryY)
    add_test(${test_name} ${test_name})
endforeach()
Unit Test Files
If you’re not using a testing library, your unit test source files contain at least one function: main (or another entry point). If this returns 0, the test passes. Any other value indicates failure.
CTest does not come with assert macros or functions, so you have two options. You can choose to return from the main function if something unexpected happens:
int main()
{
    if (1 == 2)
    {
        return 1;
    }
    return 0;
}
You can also choose to use assert:
#include <assert.h>
int main()
{
    assert(1 != 2);
    return 0;
}
If an assertion fails, the test is failed as well.
The advantage of using asserts is that it’s easier to find out where things went wrong. However, you get a pop-up per test that fails. When running a lot of tests, this can be quite annoying.
Instead, you could choose to output some information to the unit test’s additional output (or the console, if you’re running the executable). What you output depends on how detailed you want the info to be, but a macro like this could be a good start:
#define LOG_TEST_FAILURE() printf("Test failed!\nFile: %s\nLine: %i", __FILE__, __LINE__)
Running the Tests
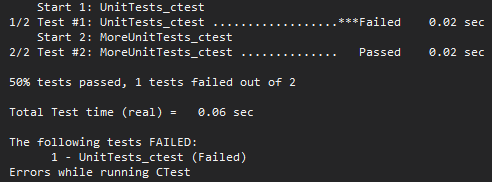
If you’re using Visual Studio, running tests is as simple as selecting “Test” in the toolbar, and clicking “Run CTest for [ProjectName]”. If a test fails here, there’s not a lot of output that helps you in finding the issue:

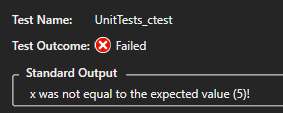
Instead, you could open the test explorer like you would with any other unit testing project and run the tests from there. If a test fails, you might see that there’s additional output:

The additional output here is all of the output a test has sent to the default output (printf, cout, etc).
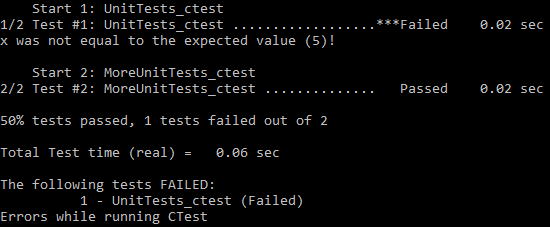
When using CMake without Visual Studio, you can run CTest in the output directory to run the tests. The output will look the exact same as when using “Run CTest for [ProjectName]”. To get some output here, use the --output-on-failure-flag. The output then looks somewhat like this:

--output-on-failureAsserts
Like I said, CTest does not come with assert macros or functions. Adding a unit testing library (Google Test, Catch2, etc) or adding your own assert-macros or functions are probably your best bet.
Using Google Test with CMake
To use Google Test in a CMake project, a bit of extra setup is required. Multiple options on how to add Google Test to a project are given, but I’ll cover the last one: Using CMake to download Google Test.
Downloading the Repository
First of all, a code snippet to download the GitHub repository is given:
cmake_minimum_required(VERSION 2.8.2)
project(googletest-download NONE)
include(ExternalProject)
ExternalProject_Add(googletest
  GIT_REPOSITORY    https://github.com/google/googletest.git
  GIT_TAG           master
  SOURCE_DIR        "${CMAKE_CURRENT_BINARY_DIR}/googletest-src"
  BINARY_DIR        "${CMAKE_CURRENT_BINARY_DIR}/googletest-build"
  CONFIGURE_COMMAND ""
  BUILD_COMMAND     ""
  INSTALL_COMMAND   ""
  TEST_COMMAND      ""
)
What this does is quite simple: After making sure that an appropriate version of CMake is installed, a new project is made: googletest-download. The NONE here specifies that no programming languages are needed to build the project.
Then, the module ExternalProject is included. Through ExternalProject_Add, a new project (googletest) is created.
In this case, a Git repository is added to the project. It is also possible to use Subversion or CVS, and any downloadable URL supported by file(DOWNLOAD) is supported as well. You can even use a local path to an archive.
Modifying CMakeLists.txt
After this, the (test) project’s CMakeLists.txt has to be modified. The full version of the changes can be found in Google Test’s readme.
configure_file(CMakeLists.txt.in googletest-download/CMakeLists.txt)
First, the configuration file is loaded. This is the file that the first code snippet (with ExternalProject_Add) was saved to. In Google’s example, this is “CMakeLists.txt.in”. You can name it whatever you like.
execute_process(COMMAND ${CMAKE_COMMAND} -G "${CMAKE_GENERATOR}" .
  RESULT_VARIABLE result
  WORKING_DIRECTORY ${CMAKE_CURRENT_BINARY_DIR}/googletest-download )
Then, a command is executed. ${CMAKE_COMMAND} is the full path to the CMake executable. -G "${CMAKE_GENERATOR}" . specifies that a project should be generated using the default generator (for me, that’s Visual Studio 16 2019. Run the command cmake --help and find the heading “Generators” if you want to find out which generator it is for you). The . makes this command run on the current working directory.RESULT_VARIABLE result specifies the variable to output the result of the last child process to. This can either be an integer return code, or a string describing an error condition.WORKING_DIRECTORY ${CMAKE_CURRENT_BINARY_DIR}/googletest-download specifies the directory to use as the current working directory.
if(result)
  message(FATAL_ERROR "CMake step for googletest failed: ${result}")
endif()
If the result is anything other than 0 (or any other constant CMake evaluates as false), the process failed and a fatal error is logged.
After a project has been generated for Google Test, another command is executed:
execute_process(COMMAND ${CMAKE_COMMAND} --build .
  RESULT_VARIABLE result
  WORKING_DIRECTORY ${CMAKE_CURRENT_BINARY_DIR}/googletest-download )
This time, the project is built.
if(result)
  message(FATAL_ERROR "Build step for googletest failed: ${result}")
endif()
If building fails, CMake logs a fatal error.
# Prevent overriding the parent project's compiler/linker
# settings on Windows
set(gtest_force_shared_crt ON CACHE BOOL "" FORCE)
gtest_force_shared_crt is set to prevent some issues with Visual Studio:
“By default, new Visual Studio projects link the C runtimes dynamically but Google Test links them statically. (…)
Google Test already has a CMake option for this: gtest_force_shared_crt
Enabling this option will make gtest link the runtimes dynamically too, and match the project in which it is included.”
# Add googletest directly to our build. This defines
# the gtest and gtest_main targets.
add_subdirectory(${CMAKE_CURRENT_BINARY_DIR}/googletest-src
                 ${CMAKE_CURRENT_BINARY_DIR}/googletest-build
                 EXCLUDE_FROM_ALL)
Like the comment says, the googletest-project is added to the build. The output files are placed in ${CMAKE_CURRENT_BINARY_DIR}/googletest-build.EXCLUDE_FROM_ALL makes sure that the subdirectory is not included in the ALL-target of the parent directory by default. The subdirectory is also excluded from IDE project files. The target(s) in the subdirectory must be explicitly build, unless anything in the project depends on the subdirectory.
# The gtest/gtest_main targets carry header search path
# dependencies automatically when using CMake 2.8.11 or
# later. Otherwise we have to add them here ourselves.
if (CMAKE_VERSION VERSION_LESS 2.8.11)
  include_directories("${gtest_SOURCE_DIR}/include")
endif()
This snippet makes sure Google Test’s include directory is added as include directory regardless of CMake version (or at least as long as it’s 2.8.2 or up, if you are using ExternalProject_Add).
# Now simply link against gtest or gtest_main as needed. Eg
add_executable(example example.cpp)
target_link_libraries(example gtest_main)
add_test(NAME example_test COMMAND example)
As an example, this is given. First, an executable example is created from example.cpp. Then, gtest_main is linked. Finally, a test (named example_test) is added to the project to be run by CTest. For this test, example is run. If COMMAND specifies a target created by add_executable, it will automatically be replaced with the location of the executable created at build time.
This is just a single test file, though. A method similar to what I suggested in “Setup” can be used if you want multiple test files.
Different here is that Google Test defines its own main function by default, so you don’t have to. Because of this, you don’t have to make the tests into separate executables, and can just stick to one:
set(SOURCES UnitTests.cpp MoreUnitTests.cpp)
set(test_name gtests)
add_executable(${test_name} ${SOURCES})
target_compile_options(${test_name} PUBLIC ${GTEST_CFLAGS})
target_link_libraries(${test_name} ${GTEST_LDFLAGS})
target_link_libraries(${test_name} gtest gtest_main)

target_link_libraries(${test_name} Project Project_Test)
After doing this, you can write unit tests just like you would in a Visual Studio project with Google Test.
Conclusion
When adding unit tests to a CMake project, CTest is probably what you’ll be using. When you understand the process, adding unit tests is quite simple.
Once you want to do something a bit more advanced, I’d recommend adding a unit testing framework to your project. Creating your own macros can be a good exercise to give you a better idea of what you’re actually doing in your unit tests, but this can be time-consuming if you want some more complicated tests. Don’t reinvent the wheel if this is the case, and pick a unit testing framework that suits your needs.
Example Project
Looking at some snippets like this might not make it entirely clear how to use this in your own project. Take a look at my GitHub to see everything in a bit more context.